Wednesday, March 30, 2011

Organza bag flower

Before I started buying fabric to make fabric flowers ( that now I make for my shop, to come!!) I had great fun in finding scrap pieces of fabric or any other fabric I could use. And those dollar stores organza bags that they give you as loot bags at parties some times are a perfect source!
They cost 1 dollar /package of 4 at my local dollar store.

Steps:

1. The bag...


2. Cut off the top


3. Tighten the knot by pulling the ribbon

4. Cut the ribbon
5. If you want, put more flowers for more layers. In this case I used a white organza bag

6. Use a hot glue gun to attach them together and stitch some cute beads in the middle
7.Use the hot glue gun again to attach a hair pin

8. Here I made another one with pearl beads


9. And there you have it, a beautiful hair clip!


Andrea

Thursday, March 24, 2011

Recycled T-shirt loot bag

A friend of mine went to a birthday party and what a surprise when the kids got their loot bags...made out of their own old T shirts! Jenny, the very creative mom (she does not blog..:0(, but I asked her permission to put her lovely idea here!) had asked weeks before for old t-shirts to all the gusts mom's.

She made out these lovely personalized and cute bags! h yes, and they came filled with goodies of course!


Aren't they lovely?
THANKS JENNY!
Andrea


Wednesday, March 23, 2011

Thrifty finds

My weekly trip to my favourite second hand store in town got me these deals!!

take a look!

Magnetic Activity box, with letters, shapes, animals and colors- $2.99


Assorted nature books for little ones- $1.99


A gooorgeous silver bracelet ( $99 cents!)
Charming winter gloves - $ 1.99
NEW ( at least doesn't seem to have ever been used..) purse- $ 3.99
A box of Dick and Jane books- $2.99
My BEST fnd ( wanted one of these for my fabric crafts!!) - a portable travel iron- B&D , vapor, perfect!) -$3.99

Oh , my thrift adventures, I loove them!
Andrea


Pinwheel hair clip

This is another very easy hair clip for us crafty moms to make and it shows off so well!

You will need:

- 5/8 in grosgrain Ribbon in your colour preference. I recommend more than one colour/pattern for a more striking AND cute result.
- Hot glue gun/fabric glue
- cute embelishment
-Small piece of felt
- Small foam ball cut in half ( ?!?!?!?!!)
-Needle, thread


1. Cut the ribbon in 20 shorter pieces of approximately 6 inches each. For cuteness , trim the edges as below and singe them in order to prevent fraying , as in here


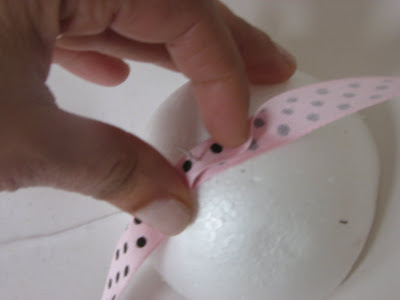
2. Hold the ribbon in the middle and fold it like this. This s the way you are going to insert it in the needle


3. Using the same foam + needle tool I crafted ( and you can too!) and used here you start inserting the ribbon pieces


4. Do this with each piece of ribbon, alternating the colour/pattern you have. But you have to insert them in a cross pattern, like this:


5. More pieces...crossing...

6. More..


7. More...

8. When you finish inserting all of your pieces of ribbon hold the whole foam + ribbon with one hand, pressing with your thumb on the top next to the needle, so they don't come out.


9. A view from the bottom...


10. Keep on holding the whole thing with one hand and with the other pull the needle + thread until all you have in your hands are the ribbon pieces without the foam


10. Sew through the ribbons 2 or 3 times and on the bottom do a security knot


11. With a hot glue gun or fabric glue attach a felt circle and a hari clip of your preference


12. On the top, for cuteness you can embellish it with whatever you please! In this case I out a cute button , using again the hot glue gun.


Another CUUUTE hair clip!!!!

Hope you enjoyed it!
Andrea


Monday, March 21, 2011

Recycled headband

My daughter had this turtle neck cotton shirt that did not fit her anymore and it was not in good condition to give to the goodwill.
I noticed that the neck part had a good width and it was very elastic, and very comfortable. My sister loves to use cute headbands on my beautiful niece so I immediately thought of her! So I started working right away to transform the turtle neck part into a cuuute very cute headband.

All you need is:

-Hot glue gun or fabric glue
-Needle and thread
-Dollar store rhinestones
-Dollar store gerbera daisies

1. Get 2 or more gerbera daisies ( without the stems)> The more the fuller your flower will be

2. Remove the centre and the back

3. Glue the flowers together using your hot glue gun or fabric gule

4. Using a dab of hot glue use the rhinestones to make the centre of the flower


5. Glue the flower on the headband using hot glue or fabric glue

6. THERE it is, my beautiful niece has a new headband!

Andrea

Spring is here!

I made this little picture holder as a gift for a young lady and I can't stress how easy it is!
The water can and the photo holder I got at Michael's for 75 cents each!
You will need hot glue gun and craft 3 rolled fabric flowers. I will post the tutorial here as well.


Simple, cheap and beautiful!

Andrea
The DIY Show Off