Sunday, April 24, 2011

Only yesterday...

Hi!


It is hard to believe that my little girl will be 4 years old in 2 weeks...it seems that it was  only yesterday that we lived the saddest period of our lives when we lost our baby boy at birth...only  yesterday I found out that a miracle had happened and I was pregnant 2 months afterwards...it seems that it was only yesterday I found out that I was expecting a little girl....she was born only yesterday, our little blessed miracle, our  little baby. And now, looking at her like that, so grown up, not a baby anymore, my little "lady" girl, posing for pictures so innocent , pure and happy, all I can do is give thanks to the Lord for all he has made, for all his blessings, for He is good!


HAPPY EASTER!


DIY parade

HI!!!
I am elated to be featured this sunday at the   DIY Show off , at the DIY Easter/Spring Projects - The DIY Project Parade. My Spring Photo Holder is there, cute and sweet among beautiful projects from fellow crafters. Please, be sure  to check this wonderful blog and all the projects that are featured there!


HAPPY SPRING!! HAPPY EASTER!! JESUS IS ALIVE!


The DIY Show Off

Thursday, April 21, 2011

Snowy Easter

Hey!!
Just to show you all how I found my backyard this morning....I must confess, it got me a bit confused....Am I mixing up the holidays? Merry Christmas...?? NO, NO , NO...HAPPY EASTER!!!


SPING is not HERE!!!! :0(

Easter Decor II

HI!
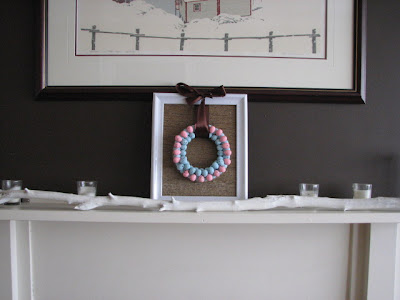
Keeping my yarn theme going ( I hope you all don't think "darn yarn, not again!!") < I made this Easter frame that was both cheap , easy and , I think , cute.

Materials:

- A small wooden wreath frame ( 1.99 at Michael's)
- Picture frame ( in this case 8x10 from Dollar store)
- Foam Easter eggs from Dollar store
-Ribbon
- (Darn) yarn  :0)
-Hot glue gun


1. Start gluing the eggs. I started by the inner circle


 2. Patiently work your way around, and if you want, make more than one layer of eggs


Well, I ran out of blue eggs, so in came the pink one
Still cute? Anyway, imagine it all blue, as I imagined it :0)

3. Frame: Do the same as here 

4. Attach the wreath to the frame. Instead of using glue, I opted for using ribbon, as it is not permanent. I intend to use the (cute) frame for other decor projects,  smart uh?
So I just opened the back of the frame, pass one end of the ribbon through, closed it again and finished with a bow 


And here it is, in place.


humm..or almost..after a while I thought the fireplace was a better place for it, what do you think?


Hope you liked it, I did!!!

Wednesday, April 20, 2011

Easter Decor I

Hii!!!

I went into a jute  yarn frenzy  lately  ( still more to post , I hope you do not mind or get bored....)
This is a simple Easter decoration, that after you remove the eggs it  can still be used as your home decor.

All you need:

- Hot glue gun
-Jute yarn
-Ceramic vase
-Dollar store foam easter eggs


 1. Start on the bottom, glue gun  + yarn
 2. Continue the process in a circle motion

 3. When you reach the top, well.... do the same ( it is quite simple, isn't it?)
 4. Almost ready....
 5. READY!


6. Fill with eggs...no need to glue them!


7. In another one I put some moss that I got from my backyard


8. And some cute pink eggs this time :0)


Happy Easter! "Sweet news", Jesus is Alive!

Monday, April 18, 2011

Burlap Brooch


HI!!!

Keeping my burlap (or lack of it theme) :0) I decided to make another piece for the burlap contest here and here ( I LOVE CONTESTS!!!). As I love to make rosette flowers ( my Etsy store almost ready to launch, just around the corner, ypiee!) I decided to make a burlap brooch. Easy peasy...

First......take a strip of burlap...in this rosette  I used one 25 inches long and 3 inches wide..

2. Fold in half lengthwise and then, at the beginning  of it fold it in a small triangle shape


3. Fold the top part of this small triangle to the middle and start rolling your burlap. At  each "turn",  fold the most external part again, always directing it to the middle and put a dab of hot glue or fabritac ( fabric glue). You can also  use needle and thread to secure it. ( my oh my,  am I explaining this  in a very complicated way?? SORRY:0( . This is easier  done than said, believe me!...try and you will see!! :0)


4. IMPORTANT: In the very beginning,  hold tightly the bottom part of the triangle you made between your thumb and index finger, and keep this way. Otherwise, the bottom of it will get to "bulky", hummm...not pretty ...

5. Keep rolling and folding your burlap, I can see a rosette already,  so  cute..can you? 

 6. keep up the good work....roll, fold, glue...
 7. more...roll. fold, glue....rosette, rosette, rosette.....
 8. Well, I will not lie, the bottom of it looks like a ( cute) mess... but do not panic!! no no no...

 9. ...Just fold it and ...GLUE IT....you can cut it to but make sure the centre of your rosette is well  attached, otherwise it may unravel..


10. Here it is, your beautiful burlap flower ( almost ) ready....but it is a brooch, remember?
so...

11. Cut a felt circle, and hot glue a brooch pin to it...


12. Glue both to the bottom of your flower

13. and YES, embellish it with some cute and feminine thing...in this case I picked beautiful (fake, but yet  beautiful) pearls.


14. You can use anywhere...to beautify an ugly disposable shopping tote or a sad looking canvas library tote bag...a beautiful and simple white blouse......you name it!!


BURLAP RULES!!


DIY Club